Sample Projecs
The following sample projects are provided to show you how RSD works:RSDTest
An introduction to the basics and PEAR::Auth
The imaginary project has the following specifications:One-line-description: A multiuser document management web application.
There are three types of data: users, documents and folders.
Users must authenticate by providing a username and password. The username must be unique. Users can be activated and deactivated. The username must be at least two characters but not more than 30. The password must be at least 4 characters but not more than 20.
Documents have a content (data), a title, a description, a date of last modification and a creation date. Each document is assigned to one folder and is owned by one user. The title must be at least two characters but not more than 100. The description is optional but must not be longer than 200 characters. When creating a new document it is possible to select the owner and the containing folder from a drop down menue.
Folders have a name and one owner. The name must be at least two characters but not more than 25. When creating a new folder it is possible to select the owner from a drop down menue.
Every user can create, delete, update and select users, documents and folders. HTML forms report all invalid input fields at once by marking the specific fileds as 'invalid'. It is possible to search for users, documents and folders. The search results can be sorted by every column (ascending and descending).
The application is sperated in three parts: model, view and controller (MVC!). For the view the template engine Smarty should be used.
Go Get It:
First Usage:
Download RSDTest v0.1.0
PCS - Project Communication Suite
An introduction to PEAR::LiveUser with dynamic right creation
PCS is a sample project for RSD that should show you the entire power of RSD and its core component the RSDEngine.
The database schema is pretty much self-explanatory. The SQL DDL can be found in PCS/0.1.current/design/ddl.sql, the DBDesigner4 file in ddl.xml and a visualization in ddl.png:
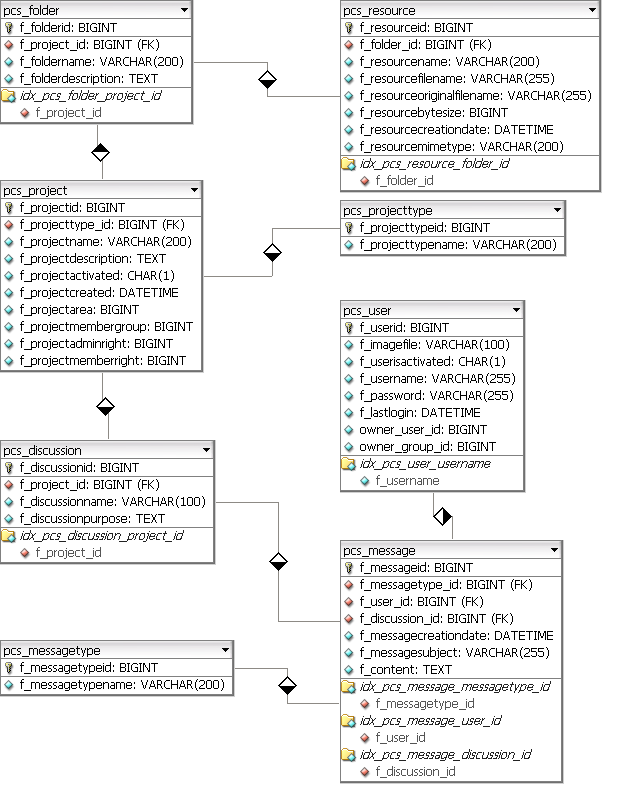
There are projects (pcs_project) with a certain project type (pcs_projecttype). Projects can have an unlimited number of discussions (pcs_discussion) and folders (pcs_discussion). A discussion can have an unlimited number of messages (pcs_message) and a folder can have an unlimited number of resources (pcs_resource). Each message can be of a certain type (pcs_messagetype).
Note that we set $config['makeSequenceAssumption'], $confg['makeIsValidAssumption'] and $config['makeInputTypeAssumption'] to true - to save us some typing the the database schema definition.
Now the difficult part:
- Project and message types (pcs_projecttype and pcs_messagetype) can only be inserted, updated and deleted by administrators; but everyone is allowed to select them.
- Everyone should be able to create deactivated users; only admins can create activated users. A user can only be updated by himself of by an admin. A user cannot be deleted. Everyone can select all users (but not see the password). An image can be uploaded for each user.
- Projects can only be created by admins. Only those users that have the admin-right for a certain project can update it. Only administrators can delete a project. Everyone that is a member of a project group can select the project. The project-admin can decide which users should be project-admins or members of the project group.
- A user can only create, delete and update a discussion if this discussion is assigned to a project the user is an admin of. A user can only select a discussion if this discussion is assigned to a project the user is a member of.
- A user can only create, delete and update a folder if this folder is assigned to a project the user is an admin of. A user can only select a folder if this folder is assigned to a project the user is a member of.
- A user can only create or select a message if this message is assigned to a discussion that is assigned to a project the user is a member of. Once a message has been created it cannot be updated or deleted. A message must be of a certain type (pcs_messagetype).
- A user can only create, update, delete or select a resource if it is assigned to a folder that is assigned to a project the user is a member of. A file must be uploaded for every resource. This file underlies the same access restrictions.
Go Get It:
First Usage:
Download PCS v0.1.2